Monday, July 25, 2011

Tie Dye For

In the true crafting spirit of the summer, I decided to partake in a little tie dye this weekend. As I don't have a yard or front porch device at my apartment, my lovely sister let me borrow hers for the project. I don't suggest working with dyes inside the house, I've done it before and apparently they actually change the color of some things...

 This shirt is way too nice, let's rough it up a bit...

Start with one shirt (Pillowcase, dish towel, etc), generally it's a good idea to start small so it'll fit into the dye bath easily. Pick a color, I usually default to blue cause it's my favey, but anything's fun.

 Don't drink the waateeeer...

Boil some water and let it cool a little bit, hot water makes the dye seep in better. You could measure how much water per dye packet you're supposed to use, but it always seems to turn up kind of faint when I do this. I boiled a pot of water, and mixed one packet in. You can use less than that, but at least this way the dye will definitely make a mark.
There are lots of fun ways to tie your shirt up, folding in on itself like an accordian, scrunching it up all crazy like, rolling it up from one end and wrapping it in around itself. I went for the classic spiral look, pinching it in the middle and twisting. Observe.

 Ow! You're pinching me!

Doesn't have to be perfect, the funkier the twist the cooler the design.

 Like a record baby, right round round round

Get it nice and tight, the more compact the bundle is the less dye will seep into the middle and the more contrast you'll have between the colored and the undyed white parts.


When it's all bundled up and rubber banded, soak it in water (Not the dye bath) for a few minutes. The dye seeps into cloth easier when it's wet, so squeeze it a couple of times when it's under the water to really get into all the corners.
Plop that bad boy in the dye bath and make sure it stays totally submerged, I weighted it down with a rock that my sis donated to the cause.

I have devised a most elegant solution.
Now onto the important part of the afternoon, wasting time while the dye bath soaks in. Sis and I had been planning a cutthroat game of Cocktail Croquet for awhile, also a fun summer activity.

Side note? Croquet mallets make excellent zombie weapons... Just sayin...
It was more cocktail than croquet, as we couldn't find the actual instructions we ended up just playing prison rules. Which means lots of extra shots, mulligans, and do overs when the dog (or us) would rip out the wickets.
When enough time has passed (The longer it sits, the darker it'll be, up to you), take it out of the dye bath and wash it out. I had a garden hose at my disposal, so I sprayed it off for a bit then dunked it in some clean water.

So wound up, you need to relax.
 
I alternated sloshing it around in clean water until it turned blue, then again in some fresh water until it stayed clear. Again, nice reason to do all this outside. Although if you're inside, a bathtub works great for this step.

 One of these things is not like the other...

Ta daaaaa! Unfurl your masterpiece and let it soak in the sun.

 Excuse me, do you know where the nearest drum circle is?

My favorite part is seeing what kind of cool pattern you get after all the twisting and rubber banding, you never really know until it's finally done.
For the first couple washes don't put it in with a bunch of white t shirts, most likely it's going to run for a bit. You can also run it through the dryer first to heat set the color, but I'd still recommend keeping it away from impressionable young clothes until it's had a chance to mature.
Until next time, happy crafting!

Wednesday, July 13, 2011

Coastahs with the mostahs

Hi folks, another craft coming at ya. I'm always looking for projects that I can finish in one afternoon, my attention span doesn't span that much longer. This one is perfect, we just painted a table we found for free on the side of the road, and are trying to keep it nice by using coasters. Unfortunately for us, we have no coasters.
I've been carrying around these two pieces of cork I got at a yard sale a loooong time ago, and was going to use them for trivets. But instead I kinda like the idea of having extra large coasters for a couple of drinks, or a nice glorious bowl of mac n cheese. Class is the name of the game after all...

This is why I can't have nice things...
 
Please forgive my sad looking little ink pad, obviously I don't treat my craft supplies as well as I should. These little colored triangles slide out so you can use them individually, probably one of the best ink-related purchases I've made in recent years.
I didn't really go into the design having a plan, I just started stamping and saw where it took me. When I plan out designs I often get so caught up in what looks perfect that I never actually get around to doing the craft. But if I take it slow and eke out just a little bit of a design at a time, it turns out more lovely than anything I could've planned.

 Cork it to me, buddy...

I wanted to do a Navajo inspired design, but I got kind of a mix of that and a space-agey type look. I'm thinking about stamping the other sides of both coasters as well, just so people have a lot of options when they're looking for the absolute most gorgeous coaster for their sweltering little drinks.
Once the ink dries on this side I'll give it a whack and post the end result here. Happy crafting!

Tuesday, July 5, 2011

Wham, bam, stamp you ma'am...

Heyoooo, it's been awhile since I posted anything, and I really need to get into the habit of crafting more than just once a month. It's tough though when you're in as committed a relationship as I am with your TV. But don't worry, I'm working on creating some boundaries...
I've been wanting to do stamping for awhile, and last night seemed like the perfect time. I always picture some crafts taking forever, but this one I banged out in a half hour, minus drying time.

 The always classy wrinkly wife beater, with 
fashion enhancing holes...

Tools: Screenprinting ink, tiny sponge triangle, and old wrinkly T shirt. I apologize for the state of my clothes, my folding technique involves balling things up and shoving them into drawers.

 Thank you IKEA for your wide 
array of cardboard boxes :)

Put some kind of layer in between the front and back of the shirt. Cardboard box or paper bag works fine, just to keep the paint from seeping through.

 Wanted to do a Navajo inspired design, this turned out a little 
bit more Puff the Magic Dragon.

I put some of the screenprinting ink onto a plate and dipped my sponge triangle into a thinish layer. Not too thin or the print won't show up, but don't glob paint on or it'll seep, run and take forever to dry.

I like the simple shapes because they're easier to cut out and work with, and honestly you can make some of the most beautiful designs using just one or two really basic shapes. Also the simpler the shape of your sponge, the cleaner your lines will be when you stamp them on the fabric.

As you can see I wear my  T shirts 
until they disintegrate or just turn into a puff of smoke...

I did a set of these shapes all down both sides of the shirt, and all along the bottom hem. Wait for one side to dry before flipping it over to do the back, the ink can easily smudge and send you into ruined craft rampage.

I was on a roll so decided to cut out a little houndstooth stamp as well and try that on another shirt. The toothpicks help me pick up and stamp down the sponge as it can get a little smushed from pinching. Some serious crafters like to affix their sponge stamps to blocks of wood to really get a firm press on the whole stamp, but that's a little bit too much work for me.

Please ignore the exposed wires in my living room...

 Once you've finished stamping it's a good idea to heat set the ink so that it won't come off in the washing machine. You can either use a hair dryer to set the ink, keeping it a foot or so away from the shirt and blasting it from the inside and outside of the shirt, or throw it in the dryer once the ink isn't sticky anymore.

Either way, a small amount of ink may come off once you wash the shirt, but that adds to the punk allure of the whole project. I find it's much easier to accept little mistakes in crafting rather than fight them, and in most cases it ends up enhancing the final piece and making it much more unique than if it turned out perfect.

Here's a couple different variations that you can do with easy shapes. The houndstooth turned out more space invader than anything else, but hey I'll take it.

 Now all I need to do is find some pants :)

 Oscar approves, though slightly confused.

Monday, June 20, 2011

Experiments in etched glass


I thought I'd try my hand at etched glass this week. I always thought it involved slowly drawing little pictures on glass with a metal file, but apparently you can create the etched glass look with cream. There's also a spray paint that gives glass a frosted look, which is very similar to etching. But one craft product at a time :)

 Such dangerous stuff in such a teeny container...

This little container is only 3 oz. and three inches tall. You only need a tiny bit so a little really goes a long way.

First things first, find your piece of glass and pick a design that you want to put on it. I save interesting looking glass like a crazy hoarder, so my collection of old liquor bottles and pasta sauce jars yielded a lovely candidate for etching.

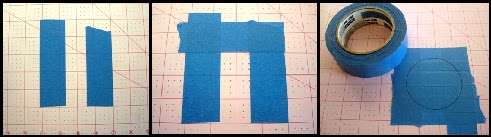
See?
 
I came up with an old whiskey bottle that has a nice flat surface perfect for this project. I found a design I liked online, usually much easier than designing something myself. Then I laid down a little square of painters tape to draw the design onto, with two strips on either side to hold the rest of the tape in place.

Boom. Boom. Boom.

I freehanded the design onto the tape; one day I'll learn how to accurately trace things onto other things, but today is not that day...


Then using my X-acto knife, I cut the design out of the tape. It looks complicated, but the straighter the lines you use are, the easier it'll be to cut out. This design only took me about five minutes to carefully cut out.


Make sure the glass you're using is really clean and dry. Any dirt or water will keep the tape from really sticking and then the etching cream will seep underneath and could mess up your design. Nothing's more frustrating than carefully drawing and cutting all these tiny pieces of tape only to have one big smudge lay itself out all over your object d'art.

Transfer the tape onto the bottle, being really careful to get every corner and piece really stuck down on the glass. I carefully ran a credit card over the surface to try and get any bubbles out. If you can look through the back of the bottle to see if there are any left.


Using a paint brush put a nice thick layer of cream down over the spots you want etched. The bottle says you should wear gloves because your skin shouldn't come in contact with the cream, and really if you're being good you should listen to them. I get this cream on my skin all the time though and nothing horrible's happened (knock on wood), as long as you're careful and wash it off right away you should be fine.


IMPORTANT NOTE: You will NOT be okay if you get this stuff into your eyes at all. So make sure you don't touch your face while you're etching, and wash your hands immediately after putting the cream on. Anything that can dissolve glass will certainly make an impact on eyeballs, so safety first...

The bottle recommends letting the cream sit for fifteen minutes, but the longer it sits, the heavier the etch will be. I personally don't find fifteen minutes to be enough time, so I'll put the cream on and go putter around with something else for an hour or so before taking it off.

To take it off just hold the whole shabang under running water, tape and all. Rub the cream off with your hands or the brush you used to put it on. When it looks clean, peel off the tape and give it a second wash to get rid of any tiny smudges left over. Don't worry about getting the cream on the places you don't want to etch, if you wash it off quickly it won't show up at all.

Let the bottle dry so the etching will really show up, and voila! Artsy glass.

 Ahhh, the fruits of a hard hours work...

If there are any tiny smudges where the cream did get under the tape, you can use a little clear nail polish to clean it up. I haven't tried that on colored glass, but I think it will work the same way. Just paint a really thin layer on the part you don't want to be etched, and no one will ever know....

Couple of other examples of experimental glass I've done in the past.
This Kraken bottle was a particularly nasty piece of work. Note this dangerous looking octopus and his majestic tentacles.
Remember when I said it's easier to cut out straights lines from painters tape? I wasn't kidding...
Pretty little swirly on a pretty little bottle...

This little guy was originally a vodka nip, now maybe suitable for a little flower on a windowsill :)

Thursday, April 21, 2011

Pendants 101

Hi everyone! This is my first official post so I wanted to make it a cool one. I'm a big fan of pendants and  earrings, and since I'm not a millionaire sometimes it's easier to just make these things ma'self.
In honor of my BFFs birthday this weekend, we went up to Rockport, MA to partake in the epically delicious Roy Moore's Lobster Shack, and ended up stopping by the local beadery as well, www.shopbeadles.com. The had a pretty stunning display of very cool looking beads, especially all the turquoise, for which I'm a sucker.


BFF came away with a beautiful teardrop pendant (Turquoise of course), but I couldn't stop myself from diving into the bargain bin. Found two sets of discount beads and couldn't wait to get home and wire them into some kind of adornment.

Pictures are blurry and weirdly lit, sorry but I took these on my sketchpad in my tiny bedroom. I'll refine my methods soon, don't worry :)
First things first, the tools for this project. Two old-ass needlenose pliers from my childhood tool shed, and a wire cutter that my grandfather may have owned.
 Obviously I don't throw down for the actual tools that you're supposed to use, just see what I can refashion from stuff lying around my apartment.
The findings, a.k.a. anything that makes up the jewelry aside from the actual jewels (and by jewels I mean the pretty pieces of plastic we're using in place of jewels).
 So, my first step was to put one of the beads on the head pin (the tiny delicate looking nail), and start crafting the loop that'll hold the pendant on a necklace chain or earring hook. A couple of millimeters above the top of the bead, bend the head pin at about a 45 degree angle away from the center.

 Make sure to leave a little space between the bend and the top of the bead so you can wrap the head pin back around itself to make a circle.
It helps if you can hold the head pin in place with one set of pliers, then use the other pliers to wrap the end of the pin back around itself. Takes a little dexterity and I find that swearing profusely helps a lot.

 I try to wrap the end of the pin back around itself as far as it can go, then snip off the last remaining bit of pin with the wire cutters. I then try to smoosh the raw edge of the cut pin back into the metal coil of the pendant loop USING THE PLIERS. Smooshing ragged metal pin tips with your bare fingers is tetanusy and frustrating.

 If you look really close up, it's not the prettiest loop in the world, but hey we're not winning prizes for neatness up in here. Most people don't closely scrutinize other people's jewelry and how it's put together, so I wouldn't be too worried about making it perfect. As long as it holds together and doesn't skewer you in the neck, you're good.
I take a little jump ring, open it a bit and pop the new pendant on there. Since the loop we made on the actual pendant is kinda small, it helps to have a slightly larger one hold it on to the necklace/earring hook. Also I like to mix and match pendants with each other, so the easier it is to take on and off a chain, the more sane I'll be by the time I make it to work.


Here's what the final product looks like. Simple, but effective.