


I thought I'd try my hand at etched glass this week. I always thought it involved slowly drawing little pictures on glass with a metal file, but apparently you can create the etched glass look with cream. There's also a spray paint that gives glass a frosted look, which is very similar to etching. But one craft product at a time :)

Such dangerous stuff in such a teeny container...
This little container is only 3 oz. and three inches tall. You only need a tiny bit so a little really goes a long way.
First things first, find your piece of glass and pick a design that you want to put on it. I save interesting looking glass like a crazy hoarder, so my collection of old liquor bottles and pasta sauce jars yielded a lovely candidate for etching.
 I came up with an old whiskey bottle that has a nice flat surface perfect for this project. I found a design I liked online, usually much easier than designing something myself. Then I laid down a little square of painters tape to draw the design onto, with two strips on either side to hold the rest of the tape in place.


See?
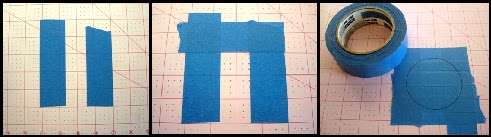
Boom. Boom. Boom.
I freehanded the design onto the tape; one day I'll learn how to accurately trace things onto other things, but today is not that day...

Then using my X-acto knife, I cut the design out of the tape. It looks complicated, but the straighter the lines you use are, the easier it'll be to cut out. This design only took me about five minutes to carefully cut out.

Make sure the glass you're using is really clean and dry. Any dirt or water will keep the tape from really sticking and then the etching cream will seep underneath and could mess up your design. Nothing's more frustrating than carefully drawing and cutting all these tiny pieces of tape only to have one big smudge lay itself out all over your object d'art.
Transfer the tape onto the bottle, being really careful to get every corner and piece really stuck down on the glass. I carefully ran a credit card over the surface to try and get any bubbles out. If you can look through the back of the bottle to see if there are any left.

Using a paint brush put a nice thick layer of cream down over the spots you want etched. The bottle says you should wear gloves because your skin shouldn't come in contact with the cream, and really if you're being good you should listen to them. I get this cream on my skin all the time though and nothing horrible's happened (knock on wood), as long as you're careful and wash it off right away you should be fine.

IMPORTANT NOTE: You will NOT be okay if you get this stuff into your eyes at all. So make sure you don't touch your face while you're etching, and wash your hands immediately after putting the cream on. Anything that can dissolve glass will certainly make an impact on eyeballs, so safety first...
The bottle recommends letting the cream sit for fifteen minutes, but the longer it sits, the heavier the etch will be. I personally don't find fifteen minutes to be enough time, so I'll put the cream on and go putter around with something else for an hour or so before taking it off.
To take it off just hold the whole shabang under running water, tape and all. Rub the cream off with your hands or the brush you used to put it on. When it looks clean, peel off the tape and give it a second wash to get rid of any tiny smudges left over. Don't worry about getting the cream on the places you don't want to etch, if you wash it off quickly it won't show up at all.
Let the bottle dry so the etching will really show up, and voila! Artsy glass.

Ahhh, the fruits of a hard hours work...
Couple of other examples of experimental glass I've done in the past.

This Kraken bottle was a particularly nasty piece of work. Note this dangerous looking octopus and his majestic tentacles.

Remember when I said it's easier to cut out straights lines from painters tape? I wasn't kidding...

Pretty little swirly on a pretty little bottle...

This little guy was originally a vodka nip, now maybe suitable for a little flower on a windowsill :)


