Tuesday, November 29, 2011

Stanley the Holiday Shrubbery


I'm sure everyone can agree with me that putting up decorations is one of the funnest and most festive parts of the holiday season. Whether it's reverently lighting a menorah and gearing up for Channukah, winding green boughs up the stairs and decorating the mantle, or even whipping out your boxed Charlie Brown tree with it's one sad little red ornament, decorating gets everyone in the spirit.

One of the big things I've missed since getting my own apartment is the holiday decorations, so this year I decided NO MORE. No more shall I stare glumly about my apartment completely lacking in sparkly green and red things, tacky gold bells and blinking fake trees. NO MORE I SAY!

So I bought a fake 3 foot tall tree at Home Depot (Cause I'm classy), and decided to make some dough ornaments (Cause I'm poor). This was also something we did when we were kids that got us in the spirit, with the very same set of cookie cutters bequeathed upon us by my Grammy Gail. Check it out:

The recipe for these goodies is crazy easy.
4 cups flour, 1 cup salt, 1.5 cups warm water.

 This may look like cookie dough. It is NOT cookie dough. It is salty, watered flour.

Stir until a ball forms.

 Balls.

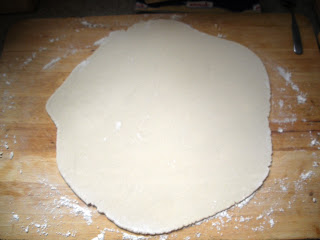
Roll out the ball on a floured surface til it's about 1/4 of an inch thick.

 I'm sure you know what rolled out dough looks like, but visuals are always helpful.

Cut out shapes.

 I got a little carried away on the stars... And trees... Also bells.

Poke a little hole for the hook or thread to go through so that you can hang it.

 The reindeer ornaments have holes right through 
their heads... Poor planning on my part.

Put on an ungreased cookie sheet and cook in a 300 degree oven for about 20-30 minutes.

 
It helps to have two or three sheets go in the oven at a time, cause you'll end up 
with about a thousand of these ornaments.


They'll puff up a little bit but will still work for our purposes.

 
Again: NOT COOKIES.

Let them cool, then wipe them gently with a very slightly damp paper towel. This just gets off excess flour so the paint will stick better. Use simple craft paint or poster paint, nothing fancy. I got mine at CVS.

 
This is the really fun part.


Make it pretty thick, because the ornaments will suck up the paint and you should do at least two coats. Don't worry, they dry quick like a bunny.

 
Bing, baang. Wait that's not right... 

It's fun to have a variety of brushes and implements for putting little decorations on the ornaments like toothpicks, straws for doing little circles, or any other tiny things you can dip in paint.

 
My favorite ornament is that crazy smiling star right there. We call him 
Hellstar cause of his dead eyes.


Unfortunately we only had one dinky paint brush and a toothpick, but we made do and came up with some pretty cool designs.

 
Also the little reindeer turned Tyrannosaur is pretty good too...


In the end it's not about having a perfect looking tree or home, it's about having fun with the people around you and making silly memories that you can gaze back on fondly later. Also it's a good idea not to get attached to anything 'cause eventually the cats will wreck it.

Hellstar gets a prime location.

So there you have it. Some salty dough, children's craft paint and one pot holder later, you have the prettiest and most cheaply put together Christmas tree in the world. Also we named him Stanley. The End.

Monday, November 7, 2011

Apples n Pumpkins n Beer, oh my!

Heyooo, sorry this is a little late, but I wanted to share my Autumnal crafts with the world.

First thing you gotta do in the Fall is go apple picking. This year the wife and I went to Honey Pot Hill Orchards in Stow, MA (check 'em out here Honey Port Hill Orchards - quality joint.) where we stocked up on what I was told was a half bushel of macintoshes. Mostly I ended up just eating them throughout the day, but I like to make some kind of apple device as well. This time it was mini apple tartlets, I'm all about the minis lately, maybe cause I feel less guilty about eating three at a time rather than a half a pie?

I'll let you check out the original recipe here Novel Eats - Mini Apple Pies; I like it because the creator originally only had a few apples to work with, so you don't need a ton of ingredients. Here are a couple of glamour shots of the final product:

 Yes, these are cat cutouts. Yes, I'm comfortable with that.

You gonna get eaten.

They were pretty awesome, I would usually grab one for breakfast on my way out the door.

Second Fall thing one must do, carve a pumpkin and use it's innards for a snack! I picked a lovely little gourd, nice n round n fat and took him home for his ritual disembowelment. Also wanted to really get in the Halloween spirit, so I decided to down some pumpkin beer as well.

It's the ciiircle of liiiiiiiifeee!!!! Get it? Cause it's pumpkin beer and I'm 
gonna carve a pumpkin? It's funny if you don't think about it.

Picking a design is the hardest part. Is your pumpkin fiercesome? Goofy? Does he have buck teeth or fangs? Triangle eyes or big circles? So many shapes to choose from! Also, I'm lazy and not as deft with a kitchen knife as I'd like to be, so the simpler the better.

I went with a mix of both, trying to carve out what I hope was cute and endearing fangs, with some matchy-matchy triangle nose and eyes to really give him some pop!

 Oh, hai! Did you scoop out my brains? Cause I'm feeling kinda sleepy...

Once le guts are scooped, I gave em a rinse making sure all the gooey parts were gone and let them dry a little bit. Then I tossed them with a tablespoon of melted butter, 1/2 teaspoon of salt and 1/2 teaspoon of pepper. 

 We really don't even have to cook these, butter makes everything edible...

Toss, toss, toss, then onto the baking tray with them. Spread em out, sprinkle a bit more salt and pepper and then pop them in the oven (325 degrees) for 25 minutes, checking every ten minutes or so.

I couldn't resist...

Honestly, I really apologize for not having a finished seed pic, but once we got them out of the oven it was like a feeding frenzy. Just a blur of butter, salt and singed pumpkin seeds . Trust me though, they were good....

Luckily, I did manage to get a pic of little Pumpkin head here before bounding off to swim through a pile of toasted pumpkin seeds a la Scrooge McDuck. Observe:

One last need for Halloween? A little friend for your pumpkin. 
No one should go trick or treating alone!

Til next time, happy holidays!